Monday, April 23, 2007
Sunday, April 22, 2007
Mar Azul
Wednesday, April 18, 2007
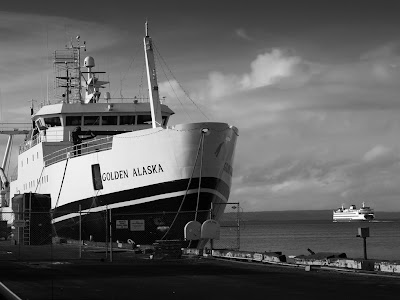
Storm Over the Islands
The first photo was taken with an E-500 & 40-150mm kit lens at f7.1 ISO200. The second shot of the same scene was taken with a Lumix FZ20 at ISO80. The noise level in the FZ20 shot is quite high even at the minimum ISO setting. The color and gray scale rendering in the E-500 was superior and all my efforts to make the FZ20 image look as good failed.
I pulled out all the stops to try and improve the FZ20 shot of Blake Island and the Ferry to make it look as good as the E-500 Shot. I used Lightroom to develop the TIFF in 16bit then opened it in PS-CS2 and changed the colormode to LAB/16. Then used curves to modify the L channel for grayscale and a & b channels for color. Then I switched to RGB/8 and applied NoiseNinja. So after an hours worth of PP the result still isn't up to the E-500 shot which took about five minutes of PP.


Here is a different development of the same E-500 negative used for the top image. This version was developed in Adobe Camera Raw then opened in PS-CS2 switched into the LAB/16 color space. The color curves a & b were steepened and the cyan blue was shifted to the right using a Hue/Saturation adjustment layer. I got the image looking the way I wanted it and then when I flattened the layers to move back in the RGB/16 color space the image change radically. The separation between the different shades in the region of blue/cyan for the most part disappeared when I flattened the image. I think this was possibly due to the combination of using Hue/Saturation and the a & b color curves.

UPDATE
The following image of the same negative was produced using LAB/16 curves without any hue/saturation layer. The results are still inferior to the image produced in RGB/16. However the separation between different shades of blue/cyan is evident to an exaggerated degree. The overall quality of the image deteriorated in the process to moving from RGB/16 to LAB/16 and then back to RGB/16. Each one of these conversions introduces some noise into the image.
Conclusion: I am not really impressed, so far, with the usefulness of this procedure.

This photo was taken with the FZ20 zoomed out to 72mm which is 432mm equivalent.

The following pair were taken with the E-500. The top image was developed entirely in 16bit from a raw file using Adobe Camera Raw and PSE4. The second one was developed in 8bit from an SHQ Jpeg.


I pulled out all the stops to try and improve the FZ20 shot of Blake Island and the Ferry to make it look as good as the E-500 Shot. I used Lightroom to develop the TIFF in 16bit then opened it in PS-CS2 and changed the colormode to LAB/16. Then used curves to modify the L channel for grayscale and a & b channels for color. Then I switched to RGB/8 and applied NoiseNinja. So after an hours worth of PP the result still isn't up to the E-500 shot which took about five minutes of PP.


Here is a different development of the same E-500 negative used for the top image. This version was developed in Adobe Camera Raw then opened in PS-CS2 switched into the LAB/16 color space. The color curves a & b were steepened and the cyan blue was shifted to the right using a Hue/Saturation adjustment layer. I got the image looking the way I wanted it and then when I flattened the layers to move back in the RGB/16 color space the image change radically. The separation between the different shades in the region of blue/cyan for the most part disappeared when I flattened the image. I think this was possibly due to the combination of using Hue/Saturation and the a & b color curves.

UPDATE
The following image of the same negative was produced using LAB/16 curves without any hue/saturation layer. The results are still inferior to the image produced in RGB/16. However the separation between different shades of blue/cyan is evident to an exaggerated degree. The overall quality of the image deteriorated in the process to moving from RGB/16 to LAB/16 and then back to RGB/16. Each one of these conversions introduces some noise into the image.
Conclusion: I am not really impressed, so far, with the usefulness of this procedure.

This photo was taken with the FZ20 zoomed out to 72mm which is 432mm equivalent.

The following pair were taken with the E-500. The top image was developed entirely in 16bit from a raw file using Adobe Camera Raw and PSE4. The second one was developed in 8bit from an SHQ Jpeg.


End of the Line
Which was taken with the E-500 + 14-45mm Kit Lens?


As promised I am doing some side by side comparisons of the Lumix FZ20 and the E-500. These shots were taken at the same place and the same time both developed from raw/tiff 16bit in LightRoom and then sized, cropped and sharpened in PE4.
I ended up liking the looks of the FZ20 image shot at native ISO 80 better than the E-500 image shot at ISO 200. The IS 8-72mm lens on the FZ20 lets me shoot at ISO 80 were I would need ISO 400 using the E-500.
Later today I will post 100% crops of both images to show you what I have already seen, the out of camera image from the FZ20 at 100% actually looked a little better than the E-500. Perhaps this is because the TIFF mode in the FZ20 still applies some sharpening even when you set sharpening in the camera to low. FZ20 doesn't have a raw mode but it does have a 16bit TIFF mode.
***FOLLOW UP*** 100% crops with 25% sharpening in LightRoom


Note: These 100% crops were sharpened in LightRoom.
In both sets the top one is the E-500 shot and there is a combination of depth of field and camera shake. The E-500 was shot at 45mm at f8 and 1/100th with the rail joiners as the point of foucs. My hand wasn't steady enough and even the rail joiners are soft when viewed at 100%.
The second photo was taken at 14.5mm f4 1/160th and the IS in mode2. The out of camera TIFF plus 25% sharpening in LR is quite sharp even with sharpening set to low and the image would require very little extra sharpening. The depth of field at 14.5mm and f4 is much greater than 45mm at f8 all other things being sort of equal.
I should have used a tripod to eliminate camera shake, however this illustrates the advantages of IS in real life shooting situations.


As promised I am doing some side by side comparisons of the Lumix FZ20 and the E-500. These shots were taken at the same place and the same time both developed from raw/tiff 16bit in LightRoom and then sized, cropped and sharpened in PE4.
I ended up liking the looks of the FZ20 image shot at native ISO 80 better than the E-500 image shot at ISO 200. The IS 8-72mm lens on the FZ20 lets me shoot at ISO 80 were I would need ISO 400 using the E-500.
Later today I will post 100% crops of both images to show you what I have already seen, the out of camera image from the FZ20 at 100% actually looked a little better than the E-500. Perhaps this is because the TIFF mode in the FZ20 still applies some sharpening even when you set sharpening in the camera to low. FZ20 doesn't have a raw mode but it does have a 16bit TIFF mode.
***FOLLOW UP*** 100% crops with 25% sharpening in LightRoom


Note: These 100% crops were sharpened in LightRoom.
In both sets the top one is the E-500 shot and there is a combination of depth of field and camera shake. The E-500 was shot at 45mm at f8 and 1/100th with the rail joiners as the point of foucs. My hand wasn't steady enough and even the rail joiners are soft when viewed at 100%.
The second photo was taken at 14.5mm f4 1/160th and the IS in mode2. The out of camera TIFF plus 25% sharpening in LR is quite sharp even with sharpening set to low and the image would require very little extra sharpening. The depth of field at 14.5mm and f4 is much greater than 45mm at f8 all other things being sort of equal.
I should have used a tripod to eliminate camera shake, however this illustrates the advantages of IS in real life shooting situations.
Sunday, April 15, 2007
Friday, April 13, 2007
Rainier Beer
Taken sunday morning in the plaza a few blocks south of First and Yesler. The man who managed to stay out of the photograph was "breaking camp" a little after 9am and he had a lot of gear not all of it shown here. As I worked on this shot he kept removing his gear one piece at a time but the bicycle and the black bag and the empty bag hanging on the iron fence he didn't move. I wish he had. Anyway I decided to post the shot with the most gear in it and I intend to go back and shoot it again without any gear. Notice the photos in the plastic sleeve leaning against the bike wheel, probably his family.


Monday, April 09, 2007
Two Owls
This shot was taken from an elevated parking lot on the corner of Yesler and First Ave aka Pioneer Square. I was shooting against a strong morning sun with the subject in the shade. For that reason the subject was very flat (low contrast) and required a lot of help from Photoshop Elements and Adobe Camera Raw. The color as shot was a sickly faded pale pink and red. I didn't like it so I made it another of my blue series.


Wednesday, April 04, 2007
Monday, April 02, 2007
Sunday, April 01, 2007
Thursday, March 29, 2007
Monday, March 26, 2007
Muddy Waters
The Green River made famous by Gary Ridgeway (a.k.a. The Green River Killer) becomes the Duwamish somewhere around here. The river is normally green but when there is high water caused by rain and melting snow the river looks more like the Nile. Selecting the water in Photoshop Elements 4 and making it a separate layer and then adding a hue and saturation layer attached to the water layer I adjusted the color to look more like the normal conditions.


Saturday, March 24, 2007
Friday, March 16, 2007
Friday, March 09, 2007
Monday, March 05, 2007
Thursday, February 22, 2007
Sunday, February 18, 2007
Saturday, February 03, 2007
Saturday, January 27, 2007
Sunday, January 21, 2007
Sunday, January 14, 2007
Saturday, January 13, 2007
Wednesday, January 10, 2007
Monday, December 25, 2006
Saturday, December 23, 2006
Subscribe to:
Posts (Atom)


